Create an audio mix!
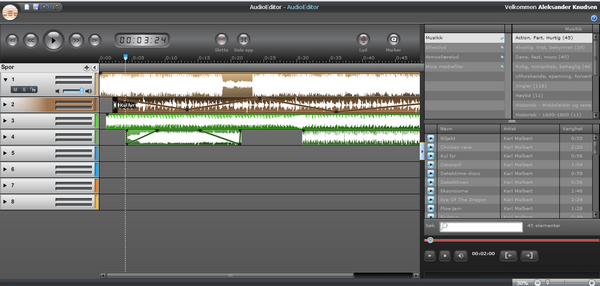
To get started, you first have to choose AudioEditor among the tools. You will then get access to music, different sound effects and the media files you have uploaded. This enables you to combine sound from Creaza's library with your own uploaded audio files, and then create your very own audio mix.
AudioEditor consists of three main components:
The Library, the Media Window and the Timeline.

The Library
The Library can be found to the right. Here you will find all the content needed in order to make your audio mix:
- Music
- Sound effects
- Contentum
- My media files
All of these four categories also have their own subcategories, which make it easier to find what you are looking for. You can also use the search box below to search for a particular sound file.
The Media Window
When you click on an audio file, it will be played in the media window in the bottom right corner. Here you will also find the play/pause, stop and volume buttons. Above these buttons you will see a visual indicator that shows you where you are within the audio clip. If you click on the timeline marker, you can drag it back and forth to find the part of the clip you want to use for your audio mix.

The Timeline
This is where you actually work on your audio mix. When you place a clip on the timeline, a series of functions that allow you to edit/adjust your clip are activated. In the media window, buttons appear that allow you to set in and out points for your audio clips. You can also edit your clip directly on the timeline, by first clicking on it and then dragging on either side of it to get the proper length. You can also click and drag the clips on the timeline where you want them to be placed.
Other functions:
- You can use the scrollbar on your mouse to zoom in and out on the timeline.
- If the marker is placed at a certain point on the timeline, the clip will play from this point.
- Use the arrow keys to navigate between different clips on the timeline.
- You can adjust the size of the library, media window and timeline by by clicking and dragging the borders between them. You can hide the library and media window by clicking the triangle on the border between them.
To the left of the different tracks on the timeline, you can adjust the volume of a particualr track. By clicking M (mute) the sound on this track will be silent. If you click S (solo) all the other tracks will be silent. You can also adjust the volume level.

You have eight tracks at your disposal and you can also add more. The volume level for individual clips on the timeline can be adjusted, as well. By clicking the top of a clip, small black dots will appear. These can be used to adjust the volume within the same clip up and down.

If you wish to record sound, place the scrub bar where you want the recording to start on the timeline, and click record. Afterwards, you can trim, move and edit the clip as you want. The clip can also be found under your media files for later use.
![]()
Listen to you audio mix!
When you wish to listen through all the different tracks you have combined and edited, you must use the buttons to the left above the timeline. There you can play, stop and pause your audio mix.
Good luck with your audio mix!


